The Edison robot’s inputs, outputs and sensors
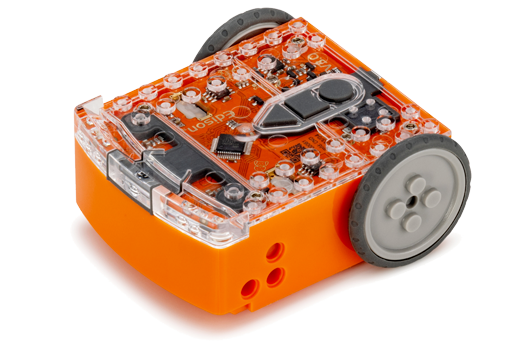
Edison robots use sensors and motors to interact with the world. The robot also has three buttons, a power switch and several removable parts. Knowing where Edison’s parts are and what they do will help you get the most out your robot.
Why do sensors matter?
Without sensors, robots are helpless (and a little useless). Sensors let robots detect and respond to the world around them. Sensors are what makes real-world robotics possible.
The Edison robot’s different sensors can detect different things including sound, visible light and infrared light. Edison can be programmed to react to the different inputs it detects using any of the Edison programming languages. The Edison robot’s sensors, along with its motors, buttons, lights and removable wheels, offer students an incredible range of ways to interact with the robots and provide the base for meaningful and interactive 21st Century education.
Learn more about each of Edison’s various parts including what each one is, what it does, why it is important and how you can use it with your students.
The sound sensor/buzzer
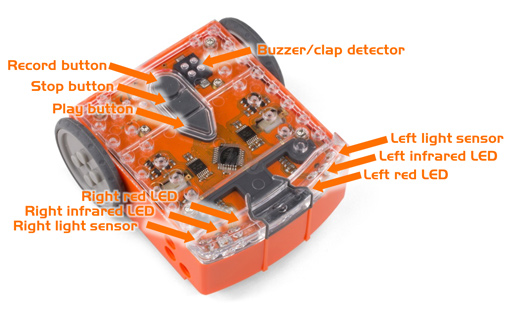
Edison has a special bit of tech which you can see just to the left side of the round button. This is a buzzer and a sound sensor all in one. As a sound sensor, it can detect loud noises, such as claps. As a buzzer, it can make noise, including beeps and musical notes.
Using the sound sensor, you can program the robot to detect and react to loud sounds. This functionality enables the ‘clap-controlled’ driving barcode program and is a great option for teaching conditionals and branching with coding.
The buzzer can be used to play music, making it an ideal way of bringing the arts into STEAM projects using Edison robots.
The lights
Edison robots have three main types of outputs: outputs using the motors, outputs using sounds, and outputs using the LEDs. Two of Edison’s LEDs are red LED lights that are located on the top of the robot near the front of Edison. When you turn Edison on, you can see these two LEDs begin to flash.
The red LED lights can be programmed to turn on or off independently, offering additional flexibility for output options. The red LEDs are ideal for use in programs as a visible signal that something has occurred, such as a sensor-driven event triggering, and allow students to add variety to their programs.
The motors
Edison robots have two motors that each control a powered socket, one on the right side of the robot and one on the left. Outputs using these motors are one of your Edison robot’s three main types of outputs. When Edison’s wheels are attached, the motors turn the axles, which turns the wheels and allows Edison to drive.
The motors can be programmed to run together or individually. The independent control of the motors allows Edison to move in different ways, including turning specified angles or pivoting on one spot. In addition to the wheels that come with Edison, the robot’s motors can be connected to different gear systems using a compatible axle, turning Edison into the programmable base for incredible creations.
The removable wheels
Both of the robot’s wheels can be detached from the robot. The wheels connect to Edison using their built-in axles which sit inside the powered sockets on either side of the robot. You can remove a wheel by pulling it straight out away from the robot. You can swap out these wheels for a compatible axle, like those in the EdCreate kit.
Swapping wheels for axles on Edison opens up all sorts of things to do with the robots. Because the wheels are separate from the motors, ‘no wheels’ doesn’t mean ‘no motors’. Edison’s powered motors can be used without the wheels to control all sorts of amazing engineered solutions. A whole new world of STEM project-based learning opens up once Edison’s wheels come off.
The buttons
There are three buttons on an Edison robot: the play (triangle) button, the stop (square) button and the record (round) button. As their names suggest, the buttons are used to program the robot and then to run and stop those programs in Edison.
The stop (square) button can only be used in one way: this button will always stop a program that is running in Edison and return the robot to ‘standby’ mode, with the red LEDs flashing back and forth. The round and triangle buttons can also be used in programs as user inputs. You can program the robots to detect and react to button presses in different ways.
Using the buttons as inputs is a great way to give more user-control over a program, for example, by programming the robot to start only when it detects a button press. This can be very helpful when using Edison as a part of a larger creation or in programs combining different sensors. Button presses are also fantastic and tactile ways of demonstrating inputs and outputs.
The light sensor
Edison’s light sensors are the sensors that let Edison detect and measure visible light. Edison’s main light sensors are on the top of the robot, one on the right and one on the left of the robot. (Edison also has a third light sensor, which is underneath the robot and works as part of the line tracking sensor.) The light sensors can be used to detect visible light, which is the portion of the light spectrum that people can see, coming from any source near Edison. The sensors measure the detected light and store the value as a light reading. The more light that is detected, the higher the light reading.
The light sensors can be used to create programs that get Edison to act autonomously, for example, by programming Edison to follow or avoid light. Because the light sensors detect light and return the measurement as a value to the robot, the light sensors are ideal for learning about data and variables in coding.
The obstacle detector
The system that allows Edison to detect and react to obstacles works using infrared light. The robot’s infrared light sensor is the sensor that lets Edison emit and detect infrared light. The sensor is made up of three parts all located across the front of Edison: two infrared LEDs (one on the right and one on the left) plus an infrared receiver in the middle. The two infrared LEDs can emit IR light, which is invisible to humans, but can be detected by Edison using the infrared receiver on the front of the robot. One way we can use Edison’s infrared light sensor is to detect obstacles.
Edison can emit infrared light from the two infrared LEDs. If that infrared encounters an obstacle, like a wall, the light is reflected back towards Edison. Edison’s infrared receiver detects the reflected light, telling Edison that there is an obstacle. The robot can be programmed to respond when it detects an obstacle, for example, by backing up and turning away.
Because the IR light sensor can be used to detect both the presence and relative location (on the right, on the left or straight ahead) of obstacles, it is ideal for teaching conditionals and branching. Obstacle detection can also be used in creative, autonomous programs, such as getting the robot to complete a 3D maze.
The line sensor
The line tracking sensor is the sensor that lets Edison see the difference between dark and light surfaces. The sensor is located on the bottom of Edison, near the power switch. The line tracking sensor is made up of two parts: a red LED and a visible light sensor.
The line tracking sensor works by shining light from the red LED onto the surface below the robot. The light sensor then measures how much of that light bounces up from the surface. Edison stores the value of the reflected light as a light reading. The more light that is reflected back to Edison, the higher the light reading. The robot can use these light readings to determine if it is on a reflective (e.g. a white) or a non-reflective (e.g. a black) surface. Edison can be programmed to react based on the surface it detects, allowing for a wide range of behaviours. The robot can be made to follow a line, stay inside black borders or change its behaviour each time it encounters a change in surface.
Thanks to its scope of use and the various ways it can be programmed, the line tracking sensor is excellent for teaching concepts such as algorithms. Because it detects visible light, the line sensor can also be used as a light sensor when Edison is in different positions or being used as a part of an engineered creation.
The remote control receiver
The Edison robot’s infrared light sensor is located on the top of the robot, right in the centre at the front. This sensor allows Edison to detect infrared light, including IR sent from remote controls, such as TV or DVD remotes. Edison can be programmed to detect and react to IR commands sent from a remote control by pairing the robot to a remote using special barcodes. The robot can then be controlled like a remote-control car!
Edison can also use the IR light sensor to detect remote commands and react in custom programmed ways. You can create programs for Edison to tell the robot what to do when it receives specific remote-control commands. This functionality is fantastic for use in creative build projects, including some of the EdCreate EdBuilds.
The IR messenger
Edison’s infrared (IR) light sensor is the sensor that lets Edison emit and detect infrared light. The sensor is made up of three parts all located across the front of Edison: two infrared LEDs (one on the right and one on the left) plus an infrared receiver in the middle. This sensor can be used to send and receive infrared messages.
The infrared light sensor is the same sensor Edison uses for obstacle detection. In obstacle detection, you use the infrared LEDs to emit infrared light and the infrared receiver to check for any of that light that has been reflected off of objects back to Edison. You can also use the infrared receiver to detect infrared light from other sources, like a TV or DVD remote control, or another Edison robot. Using the infrared receiver this way lets you send or receive messages using your robot. The ‘message’ is a pre-set signal, just like what a TV remote sends to activate a specific function, like turning the volume up.
Edison robots can use infrared light to send and receive messages to other Edison robots. One robot can send out an infrared message using its two IR LEDs which another robot’s IR receiver can detect. The receiving robot can be programmed to react to specific IR messages. Using IR messaging with multiple robots allows students to collaborate and create interactive, multi-stagged projects and programs using Edison.